
Overview
This topic shows how to import new item codes and values from .csv or .txt files.
When importing from a text file, the file must be named correctly (refer to your country-specific topics for further details) and saved in the same folder as the schema.ini file. This file tells IFP how to divide each record in the text file into columns.
Before importing actuals, please ensure that you have updated the exchange rates for the database.
Importing Item Codes
- From IFP Home select Codes Maintenance > Import Item Codes
- Select External Database/File, click Next
- On Data Import Options, set conversion table to (None) and do not select Overwrite Existing Records, click Next.
- Select the Source Data to import.
- Select the file you wish to import, e.g. MyFile.txt
- Click Next
- Select the correct import mappings (refer to your country-specific topics)
- Click Next.
Resolving Invalid or Rejected Records
If there are invalid/rejected records then the reason behind this need to be investigated. Potential reasons for this could be:
- Incomplete records could lead to incomplete item codes.
- Records are missing a description.
Applying Item Code Mapping Models
It is important that new item codes are mapped correctly before importing values. For example, in most cases the variable "BU" is not defined in source files and has to be mapped correctly for any newly-imported item codes.
The mapping process only needs to be executed for item codes that do not currently have a mapped value. These item codes may be selected by using a condition as below.
- From IFP Home Select Codes Maintenance > Item Codes Maintenance
-
Select only items which have no value for BU using the

- Apply the Assign BU code conversion table:
- Select the BU column by clicking on the column header.
- From the toolbar select Modelling > Apply Model
- Select the “Assign BU” conversion table
- Click Apply
Importing Data
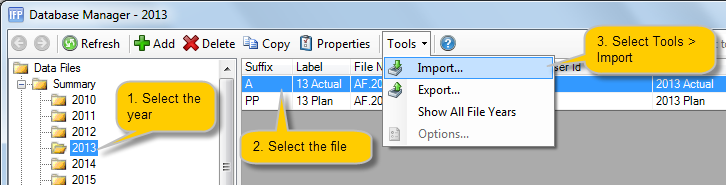
- From IFP Home select Databases/Files > Data File Manager
- Start the Import Data File Wizard:
- Select the Summary folder corresponding to the year e.g. 2013
- Select the Target File e.g. "A (13 Actual)"
- From the toolbar select Tools > Import
- Select the Period to Import
- Set the Import Currency (this will always be the default currency, unless your country-specific topics state otherwise).
- Check Units and A.S.P.
- Set conversion table to (None)
- Check Add to Existing Values
- Check Clear Target File First
- Click Next.
- Select the file to import, e.g MyFile.txt
- Click Next.
- Select the correct import mappings (refer to your country-specific topics)
- Click Next.
Lock Actuals Data File
Once the data has been successfully imported, it should be locked to the current month.
- From IFP Home select Databases / Files > Data File Manager
- Select the relevant file.
- Select Properties > Status and set the correct status for both Units and ASP.
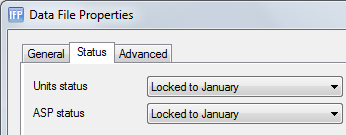
- Click OK to save the change.
Update the Database Environment Settings
Once the data is successfully imported, you should update the current month for the database. See How to Change Database Environment Settings.
Common Issues
Data Appears without Columns or Headings
The most common issue with the above process is due to saving the file with an incorrect name or in the wrong folder or the folder is missing a schema.ini file. When this happens, the preview of the file appears without proper headings in columns, similar to the example below.
The solution is to save the download file with the correct name (refer to your country-specific topics) in the same folder as the schema.ini file.

Data Import - File is Locked Message
When clicking Next on Data Import Options, an error message appears informing you the file is locked. Please follow the Lock Actual Data File section in order to unlock the file for the selected period.
Comments
0 comments
Please sign in to leave a comment.