
Overview
This topic shows how to create a database relationship Package and Conversion Table, then manually running the Sales to P&L process to transfer data between databases in order to create the AutoTasks. Sales data can then be easily transferred from Sales databases to P&L databases by Running a Sales to P&L Relationship.
Creating the Sales to P&L Package
A Package is required in the Sales database in order to transfer the sales to the P&L database. The Package needs a Data Favourite and an Item Favourite:
Data Favourite for Sales to P&L Package
Create an Analysis vs Time Data Favourite containing the sales file required (e.g. WKFC), with Period Jan-Dec. Do not include a report definition.
Item Favourite for Sales Package
Following on from this, an item favourite should be created in the Sales database:
- Include the items to transfer to the P&L database. This is usually done using the Item Type variable.
- The Level of detail should be set to include all variables which contain data required for the P&L Item Code (usually Item Type & Brand but may also include Country).
- Select Value only, Include Item Codes and Local Currency.
- Click Save Item Favourite.
Sales to P&L Package
The Package can now be created:
- From IFP Home select Reporting > Package Manager.
- Select Analysis vs Time and create a folder Sales to P&L.
- Click Add on the toolbar.
- Add a name for the Package and use the Data and Item Favourites created above.
- Add relevant notes (e.g. Package for Sales to P&L transfer) and click OK to save the Package.
Creating the Item Favourite for Sales Accounts in P&L
An item favourite should be created in the P&L database to enable zeroing sales accounts prior to importing sales data:
- From IFP Home select Reporting > Analysis vs Time.
- Select the relevant data file(s).
- Include only items you will be transferring from the sales database. This is done by selecting only those Accounts which should be cleared.
- The level of detail should be set to the last variable of the item code. This will usually be Product.
- Click Save Item Favourite.
Creating the Sales to P&L Conversion Table
The Conversion Table is required in the P&L database to map Sales combination codes to P&L Item Codes. Code Conversion Tables for Item Code Mapping covers creating a Conversion Table, although as Sales to P&L transfer is a common process it is likely this already exists in your database. Should you need to create this table, we recommend you contact AJB Systems Support.
Adding Conversion Table Rules
Rules will be required when setting up the database relationship. Any new combinations from the sales database will need a new rule in the Conversion Table. This rule should be made up as follows:

- Source Code - This will be the combination code from the variables related to the P&L Item Code (usually Item Type and Brand).
- Target Code - This will be the P&L item code for the selected sales combination.
- Factor - This should be -1. This is due to income lines being stored as a negative in the P&L database.
- Description - This will be a description of what is in the Source Code.
Importing Data
Note: If the target file already contains sales data then you should clear the relevant sales accounts first. To do this, copy a blank data file (ZERO) into the target file using the Item Favourite for Sales Accounts. We suggest creating an Autotask (e.g. Clear Sales Accounts) for this if it does not already exist.
In the P&L database, proceed as follows:
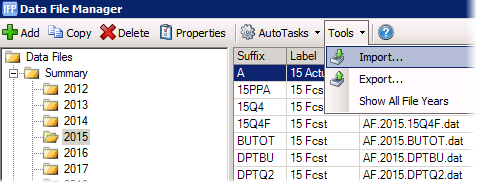
- From IFP Home select Databases/Files > Data File Manager.
- Select the target file.
- Select Tools > Import
- Select Package.
- Select the Period to Import and Import Currency (this will be the currency selected for the Sales to P&L Package). Select Add to existing values. Do not select Clear target file first, this will clear any previously imported expenses.
- Under Advanced Options, select the Sales to P&L Conversion Table.
- Select the Sales database and select the Sales to P&L Package created above.
- Assign the Field Mappings. Either:
- Map Code to the Code column and January to Jan, then Auto Map Feb-Dec (we recommend saving this as Sales to P&L Mapping for future use), or
- Load your saved Sales to P&L Mapping
Creating a MultiTask
We suggest creating a Multitask to run the Sales to P&L process. To do this:
- From IFP Home select Databases / Files > Autotask Manager.
- Select the relevant folder. We suggest creating a folder called Sales to P&L.
- From the Toolbar select Add > Multitask.
- Add the Clear Sales Accounts AutoTask and then the sales package import AutoTask (created above).
- Save and Close.
Comments
0 comments
Please sign in to leave a comment.